|
|
|
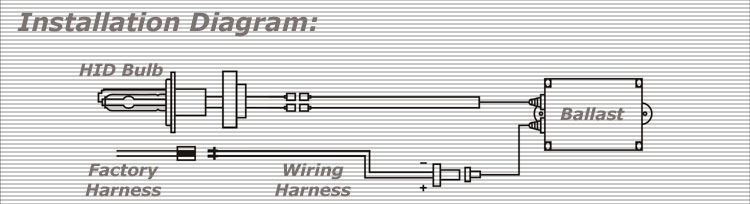 |
All of our kits
are plug and play, meaning there is no wire cutting -
no custom fitting - and no stress. Just plug it right
in like you would a regular bulb and your done.
Step-by-step instructions and a wiring diagram below
will help you with this process.
**BEWARE**
Some vehicles require more work than others due to
their unique bulb housings.
Possible removal of the bumper required - Check in
your Vehicle owners manual.
1.First and foremost disconnect the car battery
terminal.
2.Remove the factory light bulbs
3.Replace with Our xenon
bulbs. (If your vehicle has a dust cap, please replace
with something equivalent to ensure a good seal.)
*If the bulbs are dirty, use rubbing alcohol to
clean the bulbs, do not immerse it in any liquid.
4.Find a mounting location for the ballast.
- Do not drill holes on the box.
- Mount away from moving components, such as A/C or
power steering pump.
- Mount to a solid location.
- Mount to a good ventilation location (such as under
the headlight for some vehicles.)
- Some vehicles require headlight and bumper to be
removed during installation.
- Allow the necessary distance for the base connector
to reach the bulb.
5.Plug adaptor to the xenon bulbs; make sure the bulbs
are secured tightly and dust cover cap is properly
enclosed.
6.Run wiring harness in the engine bay.
- Avoid placing harness next to or close to liquids
and moving parts.
- Use zip ties to secure the wiring harness.
7.Attach the power plugs to each ballast, make sure
the plugs are securely placed and that it is firmly
intact.
8.Reconnect the car battery cables and make sure all
components are secured.
9.Turn light switch on and enjoy your brand new Xenon
headlights. Allow the light to be on for 10 minutes,
this is just a simple burn in procedure.
|
|
|
|
|
We
Accept
All Major Credit Card |
|
 |
|
|
|